Not Set
The first-class steamship Hiogo was just two months old when she was driven onto the Eddystone Rocks in good weather by an 18-year-old second mate.
Type
Two-masted auxiliary steam ship
History
The Hiogo was an auxiliary steamship owned and built by Mr. James Laing of Sunderland, the 737-ton iron ship had a single deck and was fitted with a pair of first-class 100hp steam engines. Hiogo was described as being ‘handsomely modelled’, she had watertight compartments for safety and was fitted with all the modern conveniences and luxuries expected in a first-class passenger steamship. Hiogo was launched on 19th December 1865 in Sunderland but was not completed until 5th August 1867, some 20 months later.
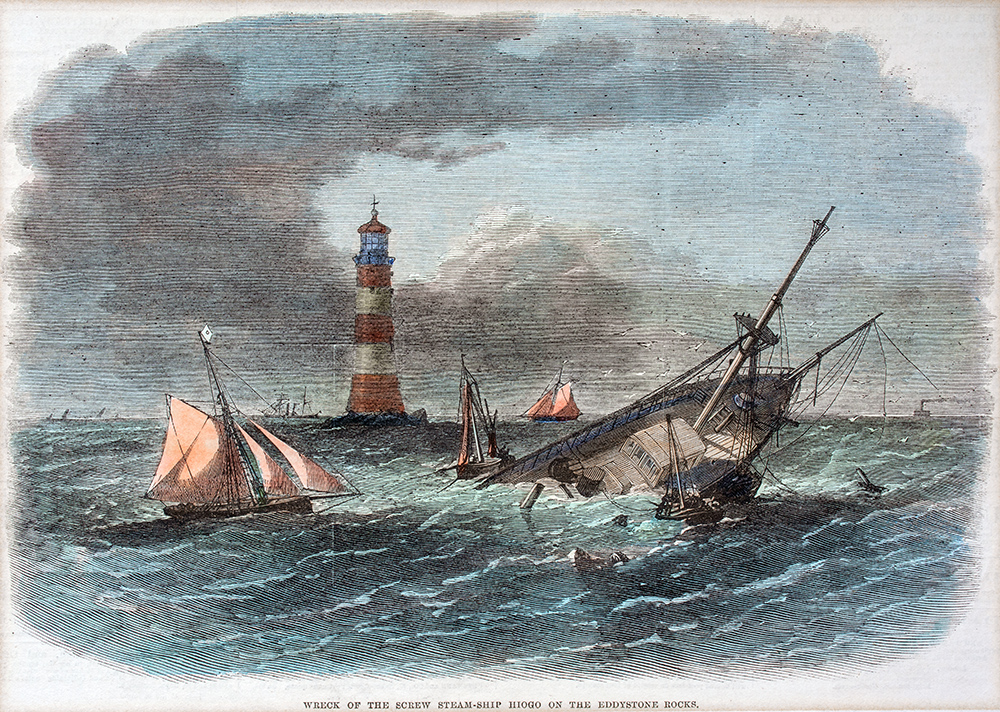
Hiogo wrecked on the Eddystone Rocks, click the image for a larger version
The fitting out was supervised by the Master, Captain Richard Bainton, and after Hiogo was commissioned, he took the ship down the east coast to the East India Dock in London to prepare for her maiden voyage to Yokohama, Hiogo and Nagasaki in Japan. The Hiogo left East India Docks, London, on the afternoon of Saturday, 28th September 1867, heading for Japan with six passengers, six officers and 20 crew. The ship was full of cargo, including bale goods from Manchester, dungarees, calicoes, cotton goods, cases of rifles and swords, and two cases of specie worth £10,000 each. On the night of Tuesday 1st October, the sea was calm, clear, and the stars were shining. There was a sea running, left over from a previous storm, but Hiogo was a well-found ship, and it gave her no trouble. The Master had remained on deck during the early part of the watch, as he had for the journey so far, but having passed the Start Point light, he thought the ship safe enough, the next point of reference on their journey was the Eddystone Reef and Smeaton’s famous lighthouse. At 11:45, the Master handed over to the chief officer and then went below to get some much-needed sleep.
First officer relieved by the 18-year-old second mate Henry Johnson at midnight, with orders to steer west northwest at 10kt, but to pass the Eddystone Reef by at least a mile. The Eddystone light came into view at 12:30 pm, shining clearly in the distance. At about 1:55 am, Johnson sent an apprentice on watch as a lookout, Hutchinson, to the Master to inform him that the bearing of the Eddystone light was NW by W, three miles off. Hutchinson returned almost immediately and said that the Master’s reply was ‘tell Mr Johnson not to go too near the light and call me at 4 o’clock’. Johnson felt uneasy, so he sent to the Master again to request a course to steer. The answer came back as before, so Johnson maintained his course and speed. Hutchinson went back to his lookout station, but shortly after, at 2:10 am, he saw breakers ahead of the ship. Hutchinson called out ‘hard a port’, Johnson heard him and shouted ‘port, port, hard a port’, and the wheel was quickly put over, but it was too late. Still going at full speed, the ship hit the Sugar Loaf rock at the northeast end of the Eddystone reef and ran several metres up the rock. Johnson quickly ordered the engines into reverse, but fortunately, with no effect because she was pinned to the rock. The vessel had been severely holed below the waterline, and had she got off would have sunk in an instant.
The passengers and crew below were rudely awakened by the impact, so all came rushing up on deck in just their nightwear, along with Captain Bainton, now much more awake. The engine room crew also appeared on deck, except one sensible crewmember who stayed to let off steam; this would prevent an explosion if cold seawater hit the hot boiler. Rockets were fired and blue lights were burnt to signal that Hiogo was in distress, but the signal guns could not be fired because no one could find the ammunition. Two passengers also fired off about 20 rounds from their revolvers, to no apparent purpose.
The ship was upright but stuck fast on the rock. On sounding the ship, they found seawater in the forehold gaining rapidly, so she was filling fast. The tide was on the flood, and as it rose, the stern lifted and the hull started to move; she settled deeper in the water forward with her fore compartment filling rapidly. Meanwhile, the five ship’s boats were launched and the passengers put into one of them for safety. By 4 am, all the crew had also left the ship in boats except the Master and Chief Officer, and at this time, the hatches on the lower fore hold burst and the ship settled deeper into the water. At 5 am two pilot cutters arrived at the scene and the passengers were transferred into pilot cutter No. 7. Hiogo was settling so the Master and Chief Officer abandoned ship and shortly after, she heeled over on her starboard side and sank deeper, leaving just the port aft gunwale just showing at high water. The pilot cutter with the passengers on board took the boats in tow back to Plymouth. Once in Plymouth Sound, the Captain went ashore in the cutter’s gig, followed shortly after by the passengers and crew, still in their nightwear because the crew and passengers’ clothes and possessions could not be saved. The crew were sent to the Plymouth Sailors’ Home while the passengers were sent to the Royal Hotel.
Steps were immediately taken to salvage what they could from the wreck. The steam tug Wellington was sent out to the Eddystone carrying six porters and eight of the Hiogo crew who volunteered to assist. Straightaway, the ship's chronometers and plate were saved, along with the chests of treasure. Wellington returned to Plymouth on Wednesday with some cases of goods that had washed out of the forehold (4). Perseverence returned to Plymouth on Friday carrying casks of oil, bales, cases, some wine, manufactured goods and cartridges. A newspaper report said that if the weather was fine on Saturday, she would be visited by Wellington and the Government tug Scotia with two teams of divers who would start recovering the cargo.
Never ones to miss an opportunity, the Plymouth boatmen arranged tourist boat trips to the wreck site on the Eddystone, with one trip by the vessel Princess carrying 120 passengers, so her decks were full. Three-quarters of one side of the steamer could be seen from her bow downwards, bow pointing to the north west, mainmast and bowsprit still standing. During one of the trips, a local artist sketched the wreck, and this was turned into an engraving by the Illustrated London News.
The inquiry into the loss of the Hiogo was held on the 15th October. The inquiry aimed to determine the facts of the case and get eyewitness statements from those involved, then make a judgment on what should happen to those found to be at fault. Some interesting details emerged in the inquiry. On the night of the wrecking, the Master had reported that he needed sleep, but he told the inquiry that he had been awake for 43 hours! The Master could also not remember being woken by Hutchinson, which is hardly surprising in his tired state. The young second mate, Johnson, thought the Eddystone was on a steep perpendicular rock with deep water all around it, so he was less concerned about being so close to the rock than anyone else! In the end, the inquiry decided that both the Master and the second mate were to blame. The court decided that the Master should have waited till they were in clear water before retiring, and his punishment was to have his Master’s certificate suspended for 12 months. The young second mate, Johnson, could have changed course at any time to avoid the reef, chose not to, so he was deemed incompetent and unable to do his job, yet he was also only suspended for 12 months.
This is a condensed version of the story. For more information, please contact The SHIPS Project.
Diving the Hiogo
Eddystone Reef, northeast side.
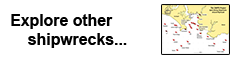
The remains of the Hiogo lie between the lighthouse and what was called the Sugar Loaf Rock, now marked as ‘NE Rock’ on the Admiralty chart. The two boilers and engine room, frames and plating are in 12m to 18m, scattered over a 50m area on the plateau between the Sugar Loaf and the Lighthouse. The best time to dive the site is in winter or spring when the kelp has died back and more of the ship can be seen.
Some years ago, the steam engine crankshaft was recovered so salvors could strip off the bearings for scrap, and the iron shaft was then dumped in Cawsand Bay. Plymouth charter dive boat skippers used to take divers onto the site, but I have not heard of anyone visiting the site in many years.
Nearby wrecks include the torpedo boat destroyer HMS Foyle ![]() , steamship Unicorn
, steamship Unicorn ![]() , patrol ship Medoc
, patrol ship Medoc ![]() , and the pilot vessel W. Woollven
, and the pilot vessel W. Woollven ![]() .
.
Last updated 20 July 2025


Information
Date Built:
19th December 1865
Type:
Two-masted auxiliary steam ship
Builder:
James Laing, Sunderland
Official Number:
58083
Length
67m / 220ft
Beam
8.5m / 28ft
Depth in Hold
4.9m / 16ft
Construction
Iron
Propulsion
Steam, 2 x 100hp steam engines by John Key & Son, Kirkcaldy
Tonnage
737.52 gross tons, 501 tons registered
Nationality
British
Crew
27
Master
Captain Richard Bainton
Owners
James Laing, Sunderland
Cargo
Bale goods, dungarees, calicoes, cotton goods, cases of rifles and swords, and two cases of specie worth £10,000 each
Portmarks
None
Voyage
London to Japan
Date of Loss
1st October 1867
Manner of Loss
Wrecked
Outcome
Salvaged, abandoned
Reference
Hob UID: 1256951
Japanese Treaty Ports
The ship was named after one of the new Japanese treaty ports that would be opened to English traders. In 1867, Emperor Meiji took the Japanese throne. Meiji opened Japan to Western ideas and resumed contact with other nations after 250 years of cultural and economic isolation. Treaty ports were created; these were designated locations in Japan where foreign merchants and residents could reside and conduct business. The British soon took advantage of this new business opportunity and built special ships for the trade with Japanese names.
Not Set
Leave a message
Your email address will not be published.
Click the images for a larger version
![Hiogo at sea [Sunderland Museum & Winter Gardens]](../images/Wrecks/SHIPS_Wk_Hiogo1.jpg)
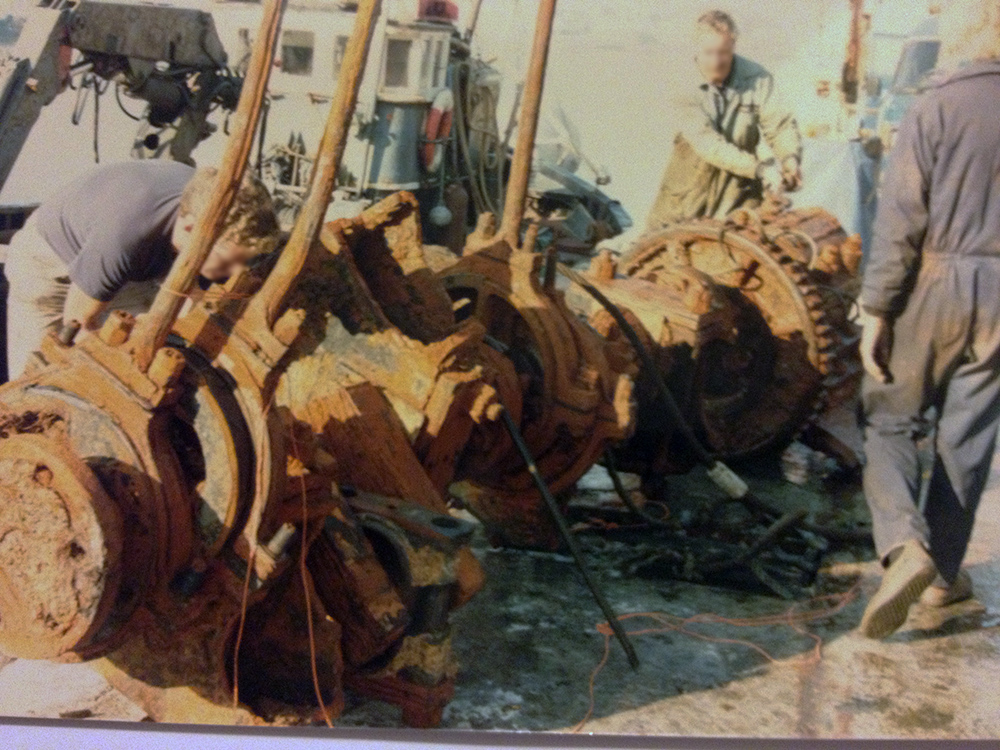
Image use policy
Our images can be used under a CC attribution non-commercial licence (unless stated otherwise).